White-label Integration Guide
This guide explains how to integrate Upload-Post directly into your own platform. This allows your users to connect their social media accounts securely through Upload-Post, enabling your platform to manage their profiles and posts via the API on their behalf.
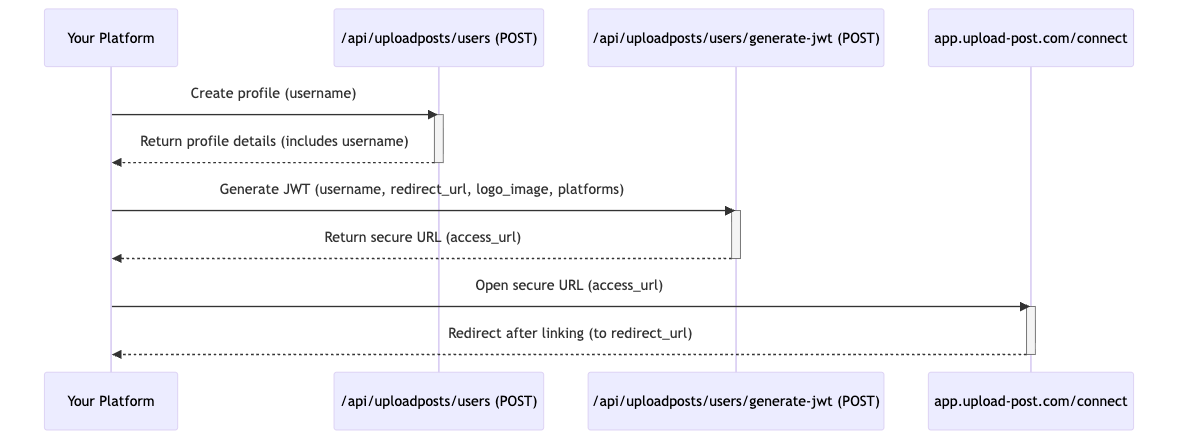
Integration Flow Overview
The core idea is to create a unique profile within Upload-Post for each user on your platform who wants to connect their social accounts. You then generate a special, secure URL that the user visits to link their accounts. Once linked, your platform can interact with the Upload-Post API using the user's unique identifier.
Step-by-Step Integration
Step 1: Create a User Profile
For each user on your platform, you need to create a corresponding profile in Upload-Post. This is done by making a POST request to the /api/uploadposts/users endpoint.
- Requirement: You must provide a unique
usernamein the request body. Thisusernameshould be a stable identifier that links the Upload-Post profile back to the user on your platform (e.g., your internal user ID). - Authentication: Remember to include your
Authorization: Apikey YOUR_API_KEYheader. - Result: The API will respond with details of the created profile, confirming the
username.
➡️ See details: Create User Profile API Reference
Step 2: Generate the Secure JWT URL
Once the profile exists, you need to generate a secure URL that your user will use to connect their social media accounts. Make a POST request to the /api/uploadposts/users/generate-jwt endpoint.
- Requirement: In the request body, provide the same unique
username(from Step 1). You can also include the following optional fields:redirect_url: A URL to which the user will be redirected after linking their account.logo_image: A URL to a logo image for branding on the linking page.redirect_button_text: (Optional) The text to display on the redirect button after linking. Defaults to "Logout connection".connect_title: (Optional) Custom title text for the connection page.connect_description: (Optional) Custom description text for the connection page.platforms: (Optional) List of platforms to show for connection. Defaults to all supported platforms.show_calendar: (Optional) Whether to show the calendar view on the connection page. Defaults totrue.readonly_calendar: (Optional) Whentrue, shows only a read-only calendar view. Users cannot edit, delete, or create posts, and cannot connect or disconnect social accounts. Ideal for sharing a content calendar with end clients. Defaults tofalse.language: (Optional) Forces the connection page language for this profile. Supported values:en,es,de,fr,pt. When omitted, the page auto-detects the visitor's browser language and falls back to English.
- Authentication: Include your
Authorization: Apikey YOUR_API_KEYheader. - Result: The API will return a JSON object containing an
access_url. This URL contains a secure token (JWT) valid for 48 hours.
➡️ See details: Generate JWT URL API Reference
Quick troubleshooting (common integration mistakes):
- If
generate-jwtreturns404, callGET /api/uploadposts/usersand verify the profileusernameexists. - If profile creation returns
403, you hit your plan profile limit. Resolve limits before retrying JWT generation. - Always treat profile creation and JWT generation as two explicit checked steps (do not ignore non-2xx responses).
Step 3: User Connects Accounts
Redirect your user to the access_url obtained in Step 2. This URL will open the Upload-Post connection interface, guiding the user through the process of securely connecting their desired social media accounts (like Instagram, TikTok, Facebook, etc.) to their profile.
Enhanced Connect Experience:
- Professional Navigation: Tab-based interface for easy switching between account connection and calendar view
- Calendar View (if enabled): Users can view their scheduled posts and upload history directly from the connect page
- Customizable Interface: You can control the branding, title, and available features through the JWT parameters
- Secure OAuth Flows: Upload-Post handles all authentication and token storage securely
The connection URL is valid for 48 hours, giving users ample time to complete the linking process.
Step 4: Manage User Content via API
After the user successfully connects their accounts in Step 3, your platform can now use other Upload-Post API endpoints to manage content on their behalf.
- When making calls to endpoints like Upload Photo or Upload Video, you will typically include the user's unique
username(the one you used in Step 1 and 2) in the request parameters to specify which profile's connected accounts should be used. - You can also retrieve the list of profiles and their connected accounts using the
GET /api/uploadposts/usersendpoint.
➡️ See details: Get User Profiles API Reference
Manual Credential Connections
Most platforms are connected through the JWT connection page (OAuth). A few platforms use a manual credential model instead: you submit the credentials to a dedicated endpoint, Upload-Post validates them with the platform, encrypts the secret at rest, and links it to the profile — no OAuth and no browser redirect. These credentials do not expire.
Connecting Discord (manual credentials)
Discord is connected with a channel incoming webhook URL, not OAuth.
- In Discord, open Server Settings → Integrations → Webhooks → New Webhook.
- Choose the channel the posts should land in and click Copy Webhook URL.
- Send the webhook URL to Upload-Post:
curl -X POST https://api.upload-post.com/api/uploadposts/users/discord/credentials \
  -H "Authorization: Apikey YOUR_API_KEY" \
  -H "Content-Type: application/json" \
  -d '{
    "profile_username": "your_user_id_123",
    "webhook_url": "https://discord.com/api/webhooks/123456789/abcdef...",
    "name": "My Server #announcements"
  }'
Upload-Post validates the webhook (GET on the URL), encrypts and stores it, and sets social_accounts.discord on the profile. After connecting, post with platform[]=discord on the text, photo, and video endpoints. Discord supports text (max 2000 chars), up to 10 images per message, and video. Analytics are not available for Discord.
➡️ See details: Connect Discord API Reference
Connecting Telegram (manual credentials)
Telegram is connected with your own bot plus a target chat, not OAuth.
- In Telegram, message @BotFather, send
/newbot, and follow the prompts to obtain a bot token. - Add the bot to the target channel or group as an administrator (it must be an admin to post).
- Determine the
chat_id: a public channel can use its@username; private chats use the numeric id (e.g.-100123456789). - Send the credentials to Upload-Post:
curl -X POST https://api.upload-post.com/api/uploadposts/users/telegram/credentials \
  -H "Authorization: Apikey YOUR_API_KEY" \
  -H "Content-Type: application/json" \
  -d '{
    "profile_username": "your_user_id_123",
    "bot_token": "123456:ABC-DEF1234ghIkl-zyx57W2v1u123ew11",
    "chat_id": "@my_channel",
    "name": "My Channel"
  }'
Upload-Post validates the token (getMe) and chat (getChat), encrypts and stores the bot token, and sets social_accounts.telegram on the profile. After connecting, post with platform[]=telegram on the text, photo, and video endpoints. Telegram supports text (max 4096 chars), single or multiple photos (album), and video (caption max 1024 chars). Analytics are not available for Telegram.
➡️ See details: Connect Telegram API Reference
Read-Only Calendar for Clients
If you're an agency managing content for clients, you can generate a read-only calendar link that lets your clients view their scheduled posts without being able to edit anything.
Use the readonly_calendar parameter when generating the JWT:
curl -X POST https://api.upload-post.com/api/uploadposts/users/generate-jwt \
  -H "Authorization: Apikey YOUR_API_KEY" \
  -H "Content-Type: application/json" \
  -d '{
    "username": "client_profile_123",
    "readonly_calendar": true,
    "logo_image": "https://youragency.com/logo.png",
    "connect_title": "Your Content Calendar"
  }'
The returned access_url will show:
- Social media channel for each post
- Scheduled date and time
- Visual (photo/video preview)
- Post text/caption
The client cannot:
- Edit, delete, or reschedule posts
- Connect or disconnect social accounts
- Access any other section of Upload-Post
This is ideal for agencies that need to share content calendars with end clients for approval or visibility.
Authentication
All API requests related to user profile management (/api/uploadposts/users and /api/uploadposts/users/generate-jwt) require authentication using your API Key. Include it in the Authorization header for every request:
Authorization: Apikey YOUR_API_KEY
Replace YOUR_API_KEY with the actual API key provided to you.
(Note: The /api/uploadposts/users/validate-jwt endpoint uses Bearer token authentication, as detailed in its specific documentation).
Next Steps
With the user profiles created and accounts linked, explore the other API references to start managing content: